Last year I visited my friend EB from Bluestocking Ball. She prepared a Greek feast that had me so inspired--nay, obsessed--that I had to come right home and make it for our friends C&D. My change to her original menu was baklava, which I was intent upon making instead of buying because I thought the omission of walnuts and addition of local pecans would make the dessert transcendent.
Like I do with most things, I jumped right into the baklava. And then I read the directions closely. Apply melted butter between each sheet of phyllo? Of which there are about 20? And do it all neat and thin like?
Eff that noise.
I searched the Internet for some obvious solution to this problem. Surely other home-cooks had made baklava and didn't waste an hour buttering dough. Surely. I typed and searched. Typed and searched. Nada. Even if I didn't have four kids at my heels, I can think of many other ways to fill my time. I grabbed my bottle of butter-flavored Target-knock-off-Pam and went to spraying. I think it took about six minutes, including the time spent opening Outlook and firing off a quick email to EB about my solution. If memory serves, she fretted about the future of my baklava and probably the state of my mental health.
C&D came bearing lovely gifts of wine, and we went to town on the Greek feast. When it was time for the baklava, I silently congratulated myself but then felt panic before cutting into it. I SPRAYED BUTTER-FLAVORED PAM BETWEEN SHEETS OF PHYLLO DOUGH AND AM GOING TO PASS THIS OFF AS A GOURMET DESSERT. If this were a feasible alternative to the butter basting, at least ten hits would have popped up in Google search. Someone out there in interweb land who knows how to do things would have guided me to this solution. What was I thinking, in my rogue dessert how-to?
I cut through the panic and served up squares of layered phyllo dough, honey syrup, pecans, and magic. Nom. Even D, who admitted later that she doesn't LOVE baklava, was into it. I'm pretty sure it was the shortcut that made it amazing. Or maybe I was just tasting victory over The Way It's Always Been Done.
That teeny victory is how wallpaper is like baklava. Everyone online says not to dare painting over stubborn adhesive backing because bad things will happen. You have to strip it. You must. Even if it's causing damage and makes you cry. To them I say... Opa! Baklava gave me the courage to do it the way I want, and so far, it's working out just fine.
Monday, June 27, 2011
Sunday, June 26, 2011
THE BEST (or worst) IDEA EVER!
I go through life with this ridiculous attitude that I can do things. Buy an obnoxiously big house and redo every room without much professional intervention? *Shrug* I don't see why not.
We have not gotten very far along in our goal to remove the adhesive layer from the breakfast room walls. There is more damage than not, and *self esteem points*, today BG and I realized that it's not just my terrible technique holding us back, but, rather, the atomic-bomb-proof adhesive that Ms. Former Owner paid someone to apply in 1976. Seriously, without our involvement, that wallpaper would have made it into some alien museum with the placard "Example of wall covering on Earth" approximately a zillion years from now.
Painting over the wallpaper was never a viable option for me. I did that once, when BG and I lived in his grandma's old house for a year, and I learned that seams don't disappear just because there's lovely color dabbed on to them. That's why we started down this road to begin with... my stubborn and ignorant attitude that if I want to take wallpaper down and make the walls look new again, then damn it, that is what I'll do, and those wall will cooperate because it's that or else! Lack-of-self-awareness alert: You'd think that parenting would have given me some wisdom when it comes to issuing ultimatums.
I've brainstormed a few options today for dealing with this mess we have created:
~ Continue on and steam and scrape. We did that for two more hours and cried uncle. It is SHOCKING how much damage we're causing to the walls.
~ Sand the adhesive layer into submission. That sorta worked, but it's really just too big of a job for our sander.
~ Cover every inch of wall surface--whether stripped or covered in adhesive backing--with shellac-based primer, then see what's doing in the morning [Note: The shellac protects absorptive material from sucking in moisture; the need for a protective barrier is the reason we're not going straight for the joint compound]. If it dries and seems safe to mud up and prime, that's the next step (with sanding in the middle). If the primer makes the backing bubble up and lift away from the wall, well all the better then. We strip the walls and move forward as if it's Plan A.
This last option is the one we're going with as soon as I hit "Publish Post."
Isn't this exciting? It's a DIY cliffhanger!
Saturday, June 25, 2011
It gets worse before it gets better
I'm pretty sure the guy who invented wallpaper is the same guy who invented fruit flies and gonorrhea. And on that note, can you guess what BG and I have been doing since 9AM? Hint: It didn't involve confidential treatment at a walk-in clinic.
We've been steaming, scraping, peeling and begging the wallpaper gods to take it easy on us, but so far, they are the vengeful Old-Testament variety.
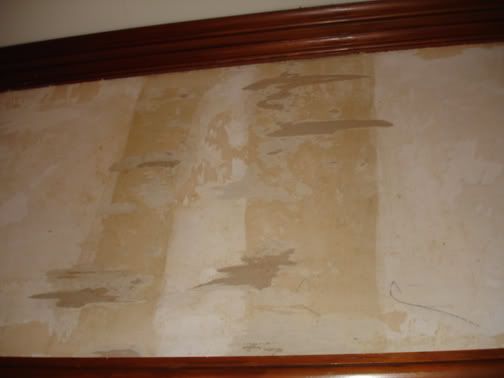
See that cardboard in the pic above? That, my friends, is Sheetrock damage. As I continually gouged and destroyed spots of the wall in an attempt to free the adhesive backing from it, I took stock in what we in the corporate world of idiotic phraseology might refer to as gaps where I should grow my skill set.
BG is much better at the non-violent scraping, but I think he might sacrifice me to the fruit flies if I suggest it's a one-person job. Tomorrow we have the adhesive layer blanketing the rest of the breakfast room waiting for us.
I've read that the repairs won't be too difficult (nothing a little shellac-based primer, sanding, joint compound, more sanding, priming, and painting can't fix. Quelle suck!). On the other hand, I also read that taking down wallpaper wouldn't be bad at all...
We've been steaming, scraping, peeling and begging the wallpaper gods to take it easy on us, but so far, they are the vengeful Old-Testament variety.

See that cardboard in the pic above? That, my friends, is Sheetrock damage. As I continually gouged and destroyed spots of the wall in an attempt to free the adhesive backing from it, I took stock in what we in the corporate world of idiotic phraseology might refer to as gaps where I should grow my skill set.

BG is much better at the non-violent scraping, but I think he might sacrifice me to the fruit flies if I suggest it's a one-person job. Tomorrow we have the adhesive layer blanketing the rest of the breakfast room waiting for us.

I've read that the repairs won't be too difficult (nothing a little shellac-based primer, sanding, joint compound, more sanding, priming, and painting can't fix. Quelle suck!). On the other hand, I also read that taking down wallpaper wouldn't be bad at all...
Sunday, June 19, 2011
Dear Thief,
I admit that we've been under the spell of our urban fairytale where neighbors host Friday happy hours and traffic yields to kids running from yard to yard. It seemed like the stuff of urban legend when we were warned to put our outdoor storage on lock-down, lest some villain invade our sweet street. I guess--thanks for the wake-up call? Now when I look around our carport and see the empty spot where BG's dad's pole saw used to rest, I imagine what you must have thought: fair game.
I know eyes will roll when I admit that I've been a bit of a bleeding heart in the past when it comes to petty theft. I mean, if you work for a fruit stand and pocket an apple because you are starving... well you gotta eat, right? Of course, that was before it was my father-in-law's apple, which we borrowed and stored in our apple cart. It is a hideous feeling to tell the owner of a borrowed thing, "Oh no! I guess someone took it." It's even worse when you find out the thing costs a couple hundred bucks. *gulp* That's a crap-ton of apples right there.

So, thief, thank you for teaching me several lessons about life in one act of assholery. We know we can't assume that things will be safe, even under our carport, one foot from our back door. We clearly need to make better use of our locked down storage in case you target us again. And, most important of all, we know no one lives in a bubble, even on streets where the Cabernet flows freely and kids run free-range.
~MBG
P.S. I hope that you find our apple delicious and then break a tooth on it.
Tuesday, June 14, 2011
Inspiration wuz here.
Many apologies for my negligent blogging over the past weekend. I was playing hostess to two fabulous girlfriends. Incidentally, one of them, EB, is a blogger and is having a lovely giveaway that you should definitely check out!
EB is inspired by Regency England in her work as a novelist. As a newb DIYer, I've been inspired by what you might describe as surprising citrus wallpaper in our breakfast room.

Before you gasp in horror, here's the big spoiler: we won't be keeping this intact. But isn't it funny when and where we find inspiration? After we toured this house, the wallpaper haunted me, and not just because I could see visions of it through my closed eyelids when I lay down to sleep that night. It seemed to scream out as the only possible color palette for our home.
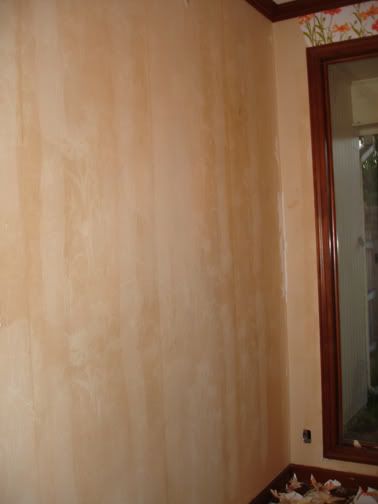
I've already committed to green through a couple of past purchases and projects. Just when I started doubting the accompanying reds, oranges, and yellows, the house spoke to me. BG stripped the layers of flowers and adhesive backing from the walls to find:
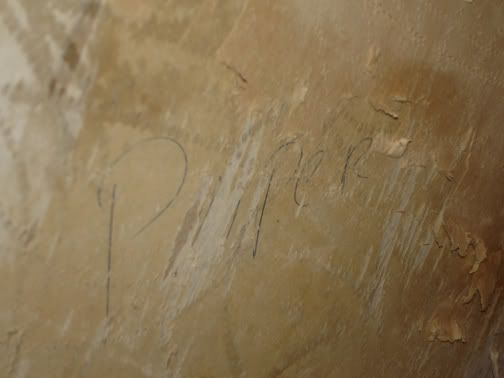
"Paper," it reads.
Well the paper's frankly got to go, but its citrus essence will remain--though I plan to take it down a few notches on the loudness scale.
EB is inspired by Regency England in her work as a novelist. As a newb DIYer, I've been inspired by what you might describe as surprising citrus wallpaper in our breakfast room.

Before you gasp in horror, here's the big spoiler: we won't be keeping this intact. But isn't it funny when and where we find inspiration? After we toured this house, the wallpaper haunted me, and not just because I could see visions of it through my closed eyelids when I lay down to sleep that night. It seemed to scream out as the only possible color palette for our home.
I've already committed to green through a couple of past purchases and projects. Just when I started doubting the accompanying reds, oranges, and yellows, the house spoke to me. BG stripped the layers of flowers and adhesive backing from the walls to find:

"Paper," it reads.
Well the paper's frankly got to go, but its citrus essence will remain--though I plan to take it down a few notches on the loudness scale.
Friday, June 3, 2011
My tragic make-up history pays off
My mom used to say of my teenage morning routine: "Why do you bother putting on make-up if you're just going to wipe it off?"
Let's put aside that I look like a drag queen when I wear a face-full of make-up (no matter who applies it), and, instead, focus on the fact that foundation makes me feel like I'm wearing Play-Doh. Cannot breathe with all of that junk drowning my pores! Honestly, I'm having a little anxiety even typing about it. Make-up was never my thing, though I excel in other girly stereotypes. A little under-eye concealer, lash curler, Clinique Black Honey, and I'm out the door.
Today I learned that wax on/wax off is more than a deep thought of my adolescence or a mantra I repeat under the florescent light of my bathroom vanity. It's the awesomest way ever to faux-paint furniture. And why would I know that? Well, a few weeks ago, I became obsessed with this zillion-dollar console table from Wisteria:

I love the simple lines, the fresh green color, and the distressed finish. I started stalking the table even before I purchased the fern drapes from my previous post. I knew a console table like this would be perfect for our foyer. The thing is, I'm way too cheap to pay $999 plus shipping and handling for a freaking console table, so-pretty-it-almost-hurts though it may be.
Then I had what Oprah calls an "Aha! Moment."
BG rescued this old gal from storage last weekend:
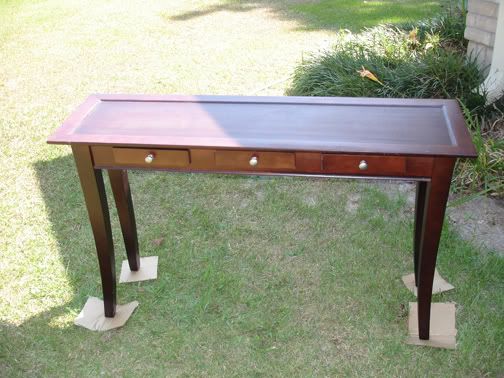
We bought it from Tar-jay about six years ago. It was intended for a hallway, and then moved into our master bedroom, and then moved into the furniture purgatory known as The Mini Storage when we were staging our old house for sale.
I know... this table is not the same as the Wisteria table even a little. Be patient. Good story telling takes time, plus MBG's had a margarita.
Don't judge.
It's Friday.
The console table didn't know what plans I had in store for her. I surprised her with them this morning.
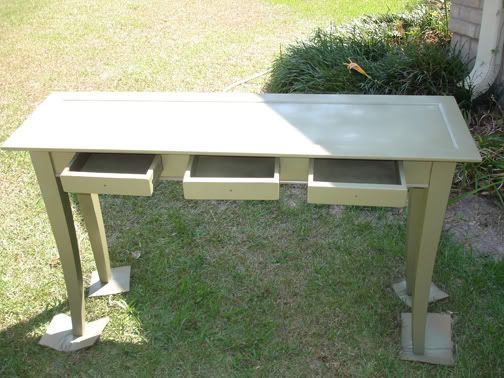
I started with two coats of this product:
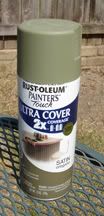
See?
At this point I started sweating--and it wasn't just because of the 101* heat index. I sort of fear painted furniture because of the shabby chic thing. Don't get me wrong; I can appreciate the cottage aesthetic in other homes, but given my vision for Modern Southern Transitional, the G abode is not a good match. I took a deep breath and dry-brushed sections of the prepared surface with matte black flat paint and wiped it off with an old washcloth. Repeat. I never used sand paper or steel wool because I didn't want a scratched appearance. I left the matte black heavier in some spots than others to legitimize the "antiquing." I also changed the hardware. An hour later, here was the finished product:
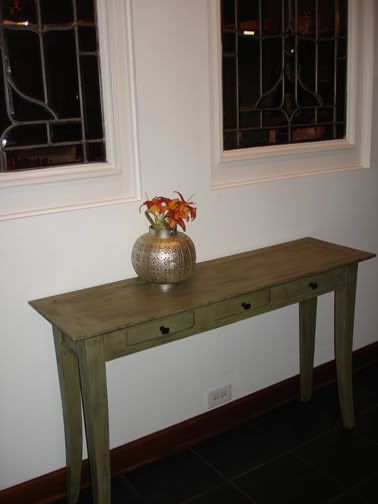
And a closer view:

If you compare the Wisteria version to mine, it's sort of reminiscent of The City Mouse and the Country Mouse. For the cost of paint, I'm good with that ;)
Let's put aside that I look like a drag queen when I wear a face-full of make-up (no matter who applies it), and, instead, focus on the fact that foundation makes me feel like I'm wearing Play-Doh. Cannot breathe with all of that junk drowning my pores! Honestly, I'm having a little anxiety even typing about it. Make-up was never my thing, though I excel in other girly stereotypes. A little under-eye concealer, lash curler, Clinique Black Honey, and I'm out the door.
Today I learned that wax on/wax off is more than a deep thought of my adolescence or a mantra I repeat under the florescent light of my bathroom vanity. It's the awesomest way ever to faux-paint furniture. And why would I know that? Well, a few weeks ago, I became obsessed with this zillion-dollar console table from Wisteria:

I love the simple lines, the fresh green color, and the distressed finish. I started stalking the table even before I purchased the fern drapes from my previous post. I knew a console table like this would be perfect for our foyer. The thing is, I'm way too cheap to pay $999 plus shipping and handling for a freaking console table, so-pretty-it-almost-hurts though it may be.
Then I had what Oprah calls an "Aha! Moment."
BG rescued this old gal from storage last weekend:

We bought it from Tar-jay about six years ago. It was intended for a hallway, and then moved into our master bedroom, and then moved into the furniture purgatory known as The Mini Storage when we were staging our old house for sale.
I know... this table is not the same as the Wisteria table even a little. Be patient. Good story telling takes time, plus MBG's had a margarita.
Don't judge.
It's Friday.
The console table didn't know what plans I had in store for her. I surprised her with them this morning.
I started with two coats of this product:

See?

At this point I started sweating--and it wasn't just because of the 101* heat index. I sort of fear painted furniture because of the shabby chic thing. Don't get me wrong; I can appreciate the cottage aesthetic in other homes, but given my vision for Modern Southern Transitional, the G abode is not a good match. I took a deep breath and dry-brushed sections of the prepared surface with matte black flat paint and wiped it off with an old washcloth. Repeat. I never used sand paper or steel wool because I didn't want a scratched appearance. I left the matte black heavier in some spots than others to legitimize the "antiquing." I also changed the hardware. An hour later, here was the finished product:

And a closer view:

If you compare the Wisteria version to mine, it's sort of reminiscent of The City Mouse and the Country Mouse. For the cost of paint, I'm good with that ;)
Thursday, June 2, 2011
Fully dressed + extra mayo
As we shift our priorities from the former jungledom of our backyard to the outdated interior of our home, I find myself thinking a lot about dressing. And I don't just mean peppery Parmesan or feta-balsamic, which, OK, are on my mind more than I care to admit. Or hamburgers, which can be dressed in a multitude of delicious ways and also take up too much of my headspace. I mean prettying things up so that they don't need a true overhaul. You know that saying "Slap some lipstick on the pig"? I hesitate to use it because I think our house would take umbrage, but I think you get my drift.
Our foyer has been in need of a little dressing. The casement windows are lovely, and I'm happy with the elegance of the white paint, but it all came together a bit icy and plain.
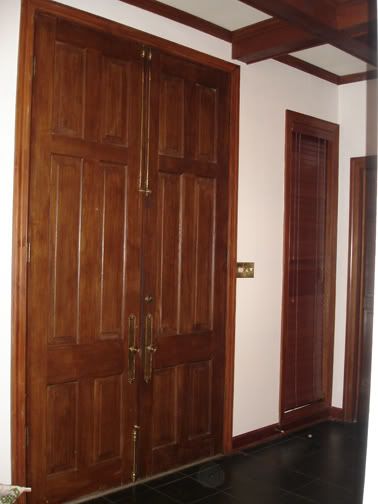
As I share my vision for dressing our foyer, I feel like I should unveil my overall concept to provide context. I'm calling it Modern Southern Transitional. The modern is to keep with the look of the exterior--bold and not at all fussy. The Southern is an acknowledgment of the high ceilings, graceful entries, and ubiquitous stained wood that really give our house its character (plus I like monograms, and what is more Southern than a monogram, I ask you?). The transitional is simply modernizing the very traditional elements we're working with--the clear stained glass of the foyer divider, the wood beams, and library paneling. Modern Southern Transitional means, to me, a look that funks up old-fashioned damasks and brocades and marries all the disparate elements that give our 1976 eclectic rambler its charm.
I hope I've achieved at least a start to that with our new window dressings.
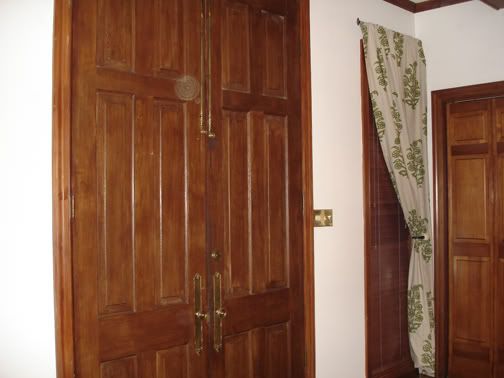
The drapes feature an elongated botanical pattern in a vibrant but not-too-bright green. The fabric is reminiscent of burlap and provides a nice contrast to the white walls.
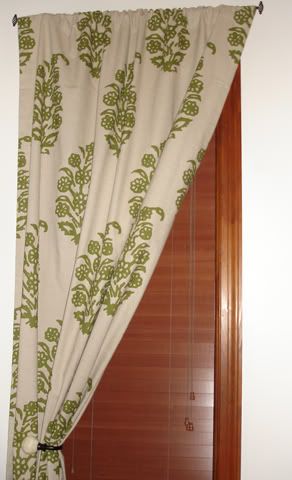
The pull-backs make easy work of accessing the blinds for opening and closing, and they also add a bit of sophistication. The hardware itself is a simple matte black, but the carved bone provides some organic texture and interest.
And now that I've turned off my design blogger voice, I can tell you that BG and I totally cheapskate-handyworked the shizzle out of this project! Drapery hardware costs a fortune, and unless it's really a statement in a home, I don't understand the logic behind spending those bucks.
My solution was to cobble together inexpensive materials and will them to work. I paid $3 each for two dowel rods, bought four tool hooks for about $8 total, and BG put in a little sweat equity. For finials, we used elongated, swirly, matte black drawer-pull hardware (approx $15 all together). BG smartly, thanks to a brainstorm by my brother, put the hardware screw into the dowel and then snipped the screwdriver end off. He then used the threads to twist the drawer pull on to the snipped screw. Et voila! $29 for two complete drapery set-ups.
BG and I are so happy with how it came out and hope you like it too! I feel really inspired to begin Phase II of the foyer dressing.
Subscribe to:
Posts (Atom)